MMV-RegionSeg
Napari plugin for the segmentation of regions by flood


![]()
![]()

This README is in English. A German version is available here: README.de.md
A Napari plugin for region segmentation using flood fill
This napari plugin was generated with copier using the napari-plugin-template.
Installation
You can install mmv-regionseg via pip:
pip install mmv-regionseg
To install latest development version :
pip install git+https://github.com/MMV-Lab/mmv-regionseg.git
Documentation
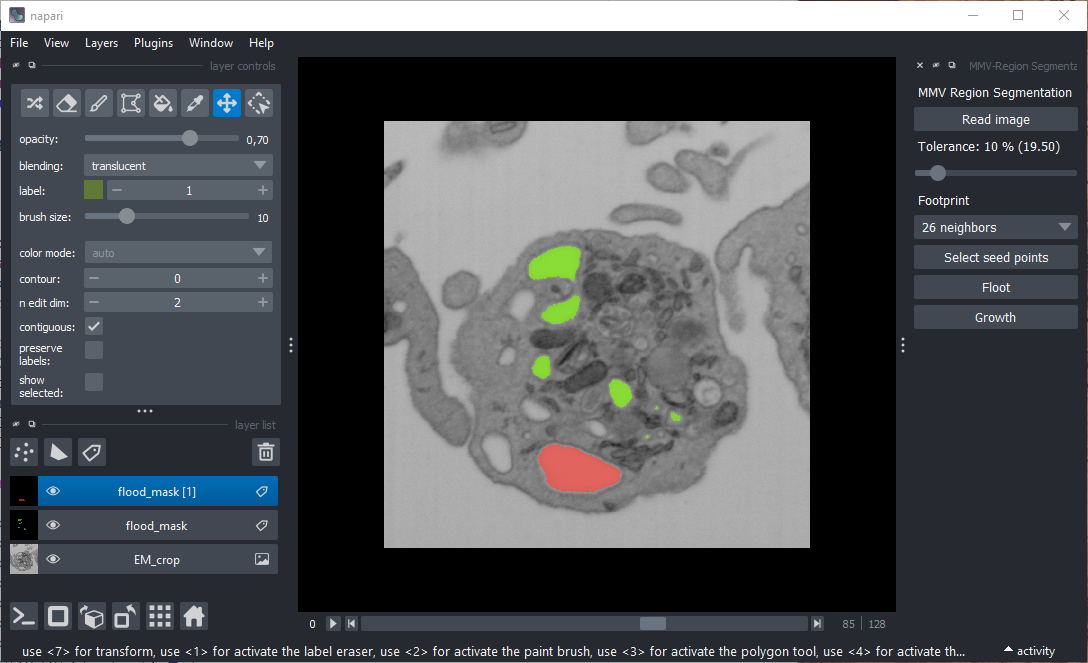
MMV-RegionSeg is a Napari plugin designed to segment three-dimensional image data based on the gray value of a selected seed point. Neighboring voxels are assigned to the same class if their intensity is sufficient similar to that of the seed point or falls within a defined tolerance range.
Launching the Plugin
- Open Napari.
- Go to the Plugins menu.
- Select MMV-RegionSeg from the dropdown.
A widget will appear on the right-hand side of the Napari window, containing buttons, labels, and a slider.
Screenshot
Loading Image Data
Click the "Read image" button to load a 3D image in TIFF format. A standard OS file dialog will open. Once the image is selected, Napari will display it as an image layer.
Adjusting Tolerance
Use the slider below the image loading button to set the gray-value tolerance (0%–100% of the dynamic range):
- Low tolerance → risk of incomplete region filling.
- High tolerance → risk of including undesired regions.
⚠️ The optimal tolerance often requires some experimentation.
Definition of the Footprint
Use the dropdown list to select the footprint for skimage.segmentation.flood.
See also: Flood Fill.
- 6 neighbors → Only voxels directly adjacent in X, Y, and Z are considered.
- 18 neighbors → Includes voxels diagonally adjacent along faces and edges.
- 26 neighbors → All neighboring voxels are included.
Selecting Seed Points
Click "Select seed points" to activate a new points layer in Napari. You can then define seed points directly in the viewer.
- Each seed point is visualized.
- Multiple seed points defined in one step are treated as one class.
- Use Napari’s Layer Controls to move or delete seed points.
Segmentation Options
After placing seed points, you can choose between two segmentation methods:
Flood
Click Flood to perform segmentation using skimage.segmentation.flood.
This identifies neighboring voxels within the tolerance range and saves them to a new label layer.
You can repeat this for additional classes by selecting new seed points. Each class receives its own label layer.
Growth
Click Growth to visualize the segmentation step by step.
This simulates the growth of a region, similar to the expansion of a cell colony in a Petri dish.
Resetting for New Segmentation
After a label layer is created, the points layer is removed, allowing you to define new seed points without affecting the existing segmentation results.
Contributing
Contributions are welcome!
Tests can be run with tox; please ensure that coverage does not decrease before submiting a pull request.
License
Distributed under the terms of the BSD-3 license, "mmv-regionseg" is free and open source software
Issues
If you encounter any problems, please file an issue along with a detailed description.
Version:
- 0.4.0
Last updated:
- 2025-10-02
First released:
- 2025-03-21
License:
- Copyright (c) 2025, Peter Lamp...
Operating system:
- Information not submitted
Requirements:
- napari<0.6.0,>=0.5.0
- numpy<2.0,>=1.23
- qtpy>=2.0
- scikit-image>=0.20
- tifffile>=2023.2.28
- pyqt5>=5.15; extra == "qt"
- tox>=4.0; extra == "testing"
- pytest>=7.0; extra == "testing"
- pytest-cov>=4.0; extra == "testing"
- pytest-qt>=4.0; extra == "testing"