FrontVeg V2


Automated plant organ segmentation and leaf area estimation in trellised crops using side view monocular RGB images.
Abdoul Djalil Ousseini Hamza (ORCID), Herearii Metuarea (ORCID), Corentin Lothodé (ORCID), Morgane Roth (ORCID), Eric Duchêne (ORCID), Lionel Ley, David Alletru (ORCID), and David Rousseau* (ORCID)
* Project Supervisor




FrontVeg V2
A napari plugin for automated plant organ segmentation and leaf area estimation in trellised crops using side view monocular RGB images.
Some examples of organ segmentation on different trellised crops:
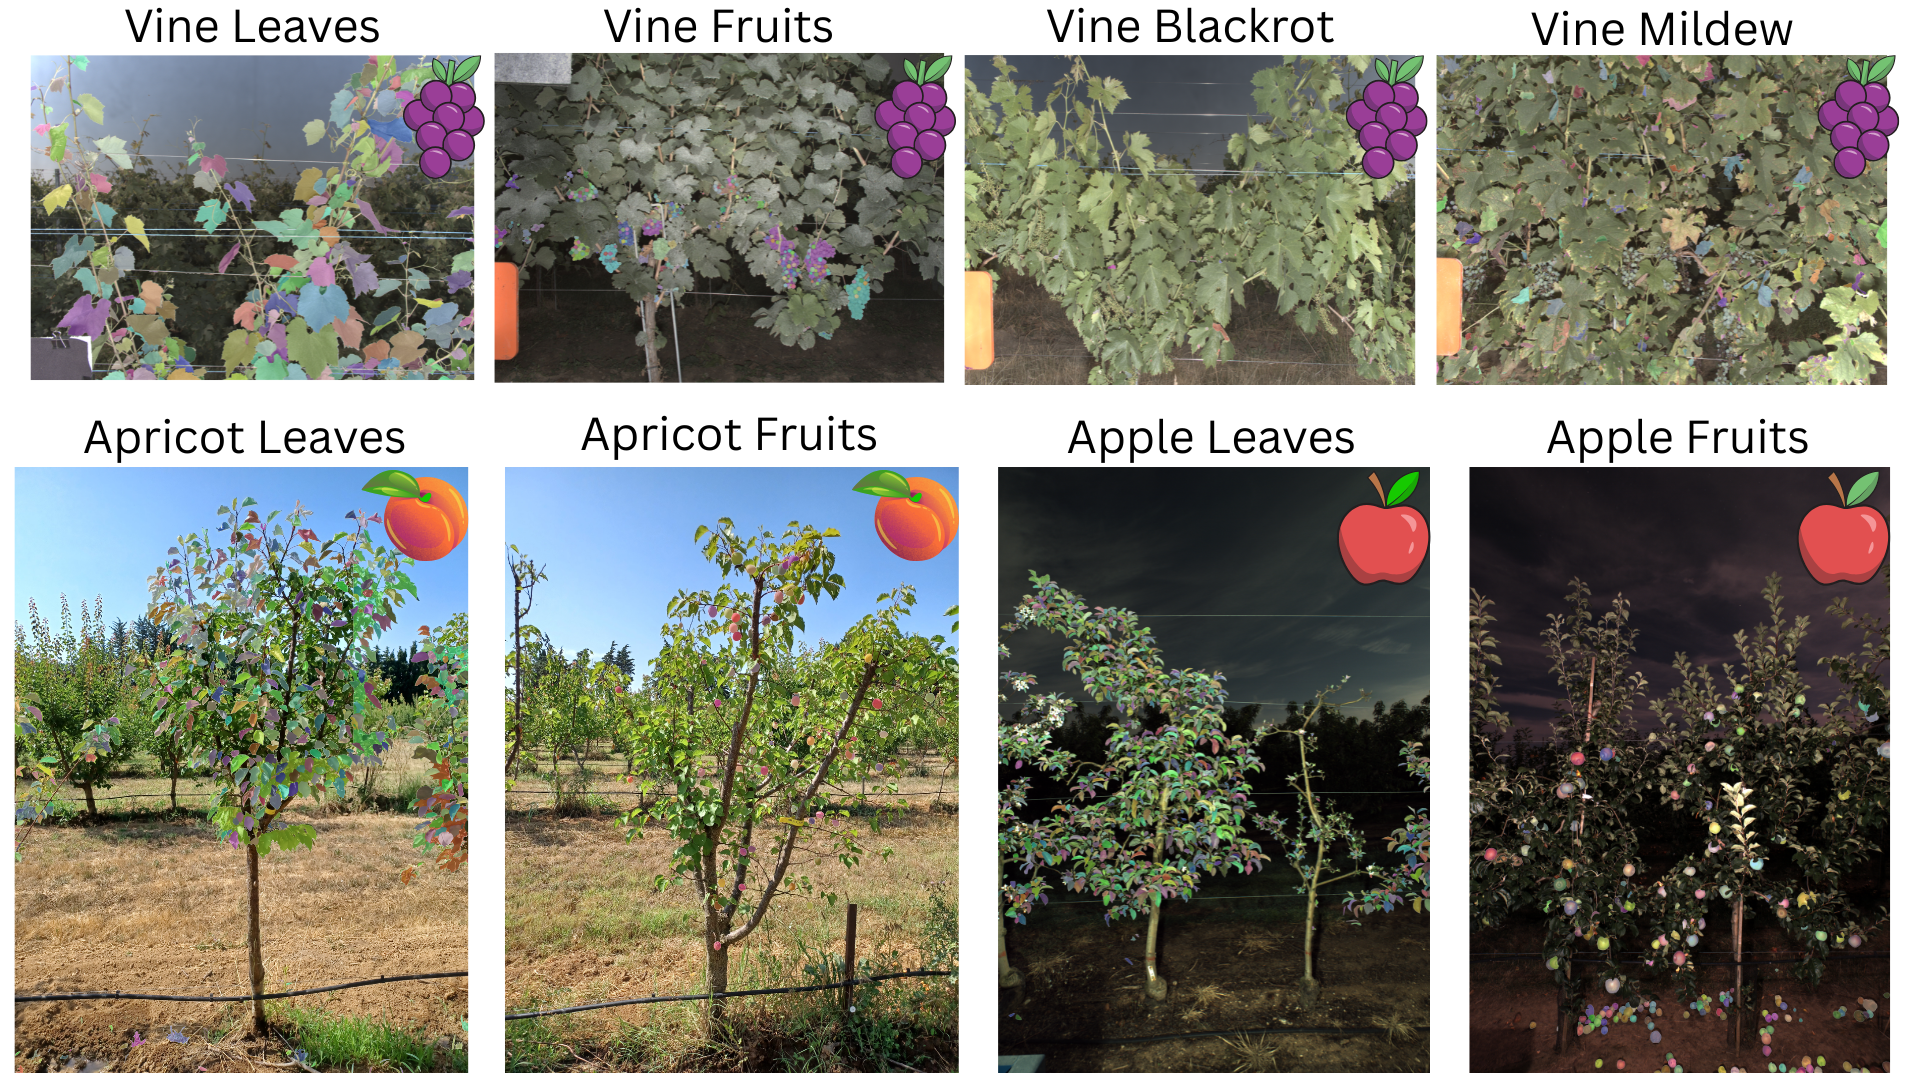
Prerequisites
- Create and activate a virtual environment
We recommend using Python 3.10 and cuda 12.1:
conda create -n <env_name> python=3.10 -y
conda activate <env_name>
pip install torch torchvision --index-url https://download.pytorch.org/whl/cu121
-
Request SAM3 Weights Access: Request access to the SAM3 checkpoint on Hugging Face. Once approved, download
sam3.pt. -
Download Depth-Anything V2 Weights: Download the Large model checkpoint (
depth_anything_v2_vitl.pth) from the official Depth-Anything V2 repository. -
Place your downloaded checkpoints inside the project folder:
- Place (
sam3.pt) into:checkpoints/sam3_ckpts/ - Place (
depth_anything_v2_vitl.pth) into:checkpoints/depthanything_ckpts/
- Place (
Installation
FrontVeg V2 requires a dedicated Conda environment and two external models: Depth-Anything V2 and SAM3.
Note: The FrontVeg V2 GitHub repository is currently private. Therefore, users should install the FrontVeg V2 package from PyPI rather than cloning the main repository.
1. Clone and install the external models
Create a directory for the external dependencies:
mkdir external
cd external
Depth-Anything V2
git clone https://github.com/DepthAnything/Depth-Anything-V2.git
Depth-Anything V2 does not need to be installed as a package at this stage; FrontVeg V2 uses it from the external/ directory.
SAM3
git clone https://github.com/facebookresearch/sam3.git
cd sam3
pip install -e .
cd ..
You should now have:
external/
├── Depth-Anything-V2/
└── sam3/
2. Install FrontVeg V2 from PyPI
Once the external dependencies have been installed, return to the directory where you want to use FrontVeg V2 and run:
pip install frontvegV2
This installs the FrontVeg V2 package and its Python dependencies.
3. Check the installation
You can verify that FrontVeg V2 is available with:
python -c "import frontveg; print('FrontVeg V2 installed successfully')"
Important: The external repositories must be installed before running FrontVeg V2. In particular, SAM3 must be installed with
pip install -e .from its cloned repository.
Alternative: Development Installation
If you have access to the private FrontVeg V2 GitHub repository and want to modify the source code, you can clone the repository and install it in editable mode:
git clone https://github.com/djaliloh/FrontVegV2.git
cd FrontVegV2

mkdir external
cd external

# Depth-Anything V2
git clone https://github.com/DepthAnything/Depth-Anything-V2.git

# SAM3
git clone https://github.com/facebookresearch/sam3.git
cd sam3
pip install -e .

cd ../..

# Install FrontVeg V2 in editable mode
pip install -e .
This development installation is intended for contributors and users who need direct access to the source code.
Usage in Napari
- Launch Napari:
napari - Open an RGB image of a row crop.
- Select Plugins > FrontVeg V2 Studio.
- Set your prompt (e.g., "leaf") and adjust parameters (Tile Overlap, Sigma, etc.).
- Click Run Complete Pipeline.
Acknowledgements
This work was supported by the French Programme et Équipements Prioritaires de Recherche (PEPR) AgroEcoNum (pepr-agroeconum.fr), the France 2030 program through the Agence Nationale de la Recherche (ANR), and the European Union’s Horizon Europe research and innovation programme (Grant No. 101094587, PHENET).
This research used computing resources from the GLiCID Computing Facility (Ligerien Group for Intensive Distributed Computing, doi:10.60487/glicid, Pays de la Loire, France), as well as HPC and storage resources provided by GENCI at IDRIS on the Jean Zay supercomputer’s H100 partition (Grant 2025-AD010115553R1).
The authors would like to thank Sirine Gharbi, Oumaima Karia, Justin Langlois, Paul Persello, and Thomas Lebouc for their valuable assistance in annotating the image dataset used in this study.
Contact
Imhorphen team, bioimaging research group,
IRHS, UMR 1345, INRAE,
42 Rue Georges Morel, 49070 Beaucouzé, France
- David Rousseau - Professor, david.rousseau@univ-angers.fr
- Corentin Lothode - Researcher Engineer, corentin.lothode@inrae.fr
- Herearii Metuarea - PhD student, herearii.metuarea@univ-angers.fr
- Abdoul Djalil Ousseini Hamza - Engineer, abdoul-djalil.ousseini-hamza@inrae.fr
Troubleshooting
- Missing Module 'triton': On Windows, install the Windows-compatible Triton build: pip install triton-windows.
- RuntimeError: mat1 and mat2 must have the same dtype: If running on GPUs older than NVIDIA Ampere (e.g., GTX 10xx, RTX 20xx), ensure autocast is set to float16 or float32 instead of bfloat16.
- Missing Checkpoints Error: Verify that sam3.pt exists at the expected path or set FRONTVEG_SAM3_CKPT manually.
License
FrontVeg V2 is released under the MIT License. See the LICENSE.txt file for details.
Third-party software and models used by FrontVeg V2, including SAM3 and Depth Anything V2, are subject to their respective licenses and terms.
Contributing
Contributions, bug reports, feature requests, and suggestions are welcome.
To contribute:
- Fork the repository.
- Create a new branch for your changes.
- Make your changes and test them locally.
- Commit your changes with a clear and descriptive message.
- Open a pull request describing your changes and their purpose.
For bugs or feature requests, please open an issue and provide enough information to reproduce the problem or evaluate the proposed feature.
By contributing to this repository, you agree that your contributions will be distributed under the same license as the project.
Version:
- 2.2.0
Last updated:
- 2026-09-10
First released:
- 2026-08-09
License:
- MIT
Operating system:
- Information not submitted
Requirements:
- napari[all]
- numpy==1.26.4
- opencv-python==4.8.1.78
- pillow
- scipy
- matplotlib
- einops
- triton-windows; sys_platform == "win32"
- triton; sys_platform == "linux"
- setuptools==69.5.1
- scikit-learn
- decord
- psutil
- pycocotools
- pandas
- scikit-image
- setuptools==69.5.1; extra == "dev"
- scikit-learn; extra == "dev"
- decord; extra == "dev"
- psutil; extra == "dev"